Creating an Ubuntu Bootable Flash Drive
Written by Kai Hoshira & Noah Taylor
First Edition
October 24, 2026
Creating an Ubuntu USB Installer with Rufus
Requirements: Windows PC, internet connection, and a USB flash drive (8 GB minimum, 16 GB recommended).
Step 1: Download Ubuntu
Visit Ubuntu Desktop Downloads.
Download Ubuntu Desktop 24.04 LTS (64-bit) if you're matching our existing KaiLink test environment. Other Ubuntu versions may also work, but should be tested separately.
The downloaded file will have an .iso extension. Save it to your Downloads folder.
Step 2: Download Rufus
Visit rufus.ie and download the latest Rufus for Windows.
Rufus is free, and the portable version doesn't require installation. Launch it and approve the Windows administrator prompt if one appears.
Step 3: Insert your USB drive
Connect the USB flash drive to your Windows computer.
Important: Rufus will erase everything on the selected USB drive. Back up anything you need before continuing.
Step 4: Configure Rufus
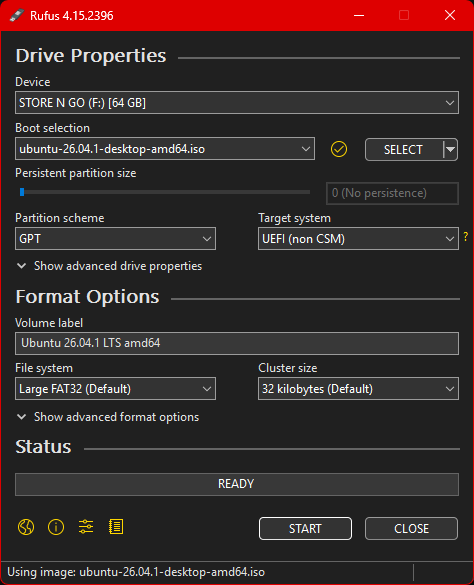
Choose the following settings:
Device: Your USB flash drive
Boot selection: Disk or ISO image
ISO file: Downloaded Ubuntu .iso
Partition scheme: GPT
Target system: UEFI (non CSM)
Volume label: Leave default
File system: Leave Rufus default
Cluster size: Leave default
Click SELECT to locate the Ubuntu ISO. GPT/UEFI is recommended for modern PCs; legacy BIOS machines may require MBR instead.
Step 5: Write Ubuntu to the USB drive
Click START.
If Rufus displays an ISOHybrid prompt, select Write in ISO Image mode (Recommended).
If asked to download additional files, click Yes.
Confirm the warning that the USB drive will be erased.
⚠️ Important installation warning ⚠️
All data on the USB drive will be erased. This cannot be undone. Make sure you have selected the correct drive and that there is no needed data on it.
Wait until Rufus displays READY, then click CLOSE.
The USB installer is now ready.
Step 6: Boot the computer from USB
Read all instructions before continuing.
Insert the USB installer into the computer where Ubuntu will be installed.
Power on or restart the computer.
Open the boot selection menu, commonly using F12, F11, F9, or Esc, depending on the manufacturer.
Select the USB drive, preferably its UEFI entry.
When the Ubuntu startup menu appears, select Try or Install Ubuntu.
Follow the installer prompts to install Ubuntu.
⚠️ Important installation warning ⚠️
Selecting Erase disk and install Ubuntu will remove existing operating systems and data from the selected installation drive. This cannot be undone. Make sure the correct drive is selected.
Once the installation finishes, restart the computer and remove the USB drive when prompted.
For KaiLink, I'd recommend Ubuntu Desktop rather than Ubuntu Server because KaiLink Heartbeat and Console architecture need Chromium running in a graphical desktop session.